
Introduction: In today’s fast-paced world, finding time to tend to our gardens can be a challenge. But what if there was a way to ensure our plants receive the care they need, even when we’re busy or away from home? Enter the world of DIY electronics and automation! In this blog post, we’ll explore how to build an automated plant watering system using Arduino Uno, revolutionizing the way we care for our gardens.
Why Automated Plant Watering? Before we dive into the technical details, let’s consider the benefits of automated plant watering. By automating the watering process, we can:
- Ensure plants receive the right amount of water at the right time, promoting healthy growth.
- Save time and effort spent on manual watering, especially for large gardens or indoor plant collections.
- Monitor plant health remotely, allowing us to address any issues promptly, even when we’re away from home.
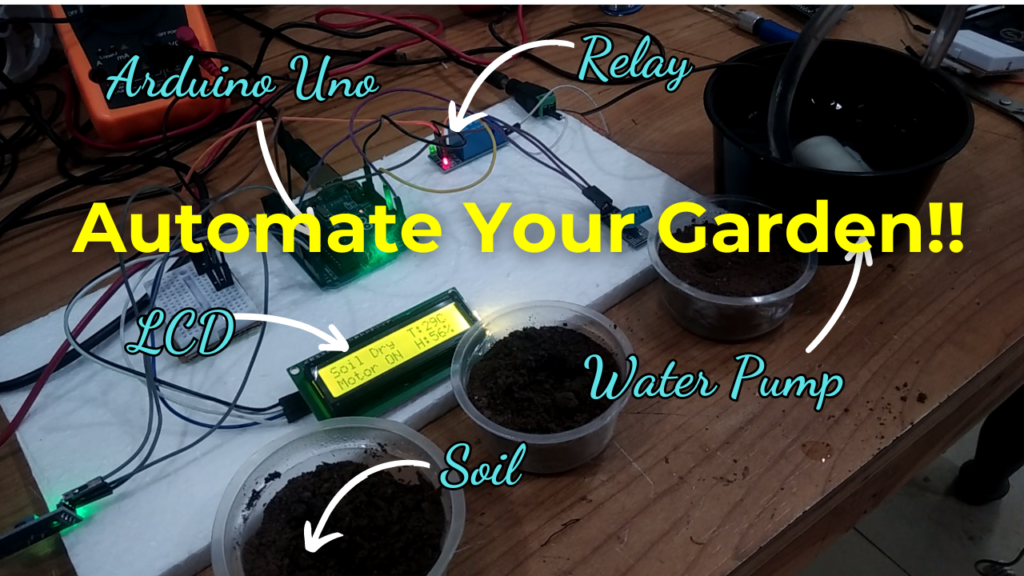
Components Needed: To build our automated plant watering system, we’ll need the following components:
- Arduino Uno: The brains of our operation, responsible for monitoring soil moisture levels and controlling the watering system.
- Soil Moisture Sensor: Detects the moisture level in the soil and triggers the watering system when moisture levels are low.
- Relay Module: Controls the water pump or solenoid valve to deliver water to the plants.
- Breadboard
- 12v DC Pump : Delivers water from a reservoir to the plants.
- Jumper wires
- DC Socket
- Power Supply: Provides power to the Arduino Uno and other components.
- LCD Display + I2C:
- DHT11 Temperature Sensor (for environmental monitoring).

Building the System:
- Connect the soil moisture sensor to the Arduino Uno to measure soil moisture levels.
- Write code to read sensor data and control the relay module based on moisture levels.
- Connect the relay module to the water pump or solenoid valve to deliver water to the plants.
- Optionally, integrate additional sensors like the PIR motion sensor or DHT11 temperature sensor for enhanced functionality.
- Test the system to ensure proper operation and make any necessary adjustments.
Watch the tutorial now to make your own Automated Garden
Benefits of Using Arduino Uno: Arduino Uno is an ideal platform for building our automated plant watering system due to its ease of use, versatility, and affordability. With a vast community of makers and extensive documentation available online, Arduino Uno offers endless possibilities for creating custom electronics projects like ours.
Conclusion: By harnessing the power of DIY electronics and automation, we can revolutionize the way we care for our gardens. With an automated plant watering system built using Arduino Uno, we can ensure our plants receive the care they need, even when life gets busy. So why wait? Let’s roll up our sleeves, unleash our creativity, and transform our gardens into thriving oases of greenery and life.
Happy gardening!
