TheIshanJain.com

Arduino

Blog

DIY Home Automation Project: How to Make Smart Home with Arduino Uno | Bluetooth Control Tutorial

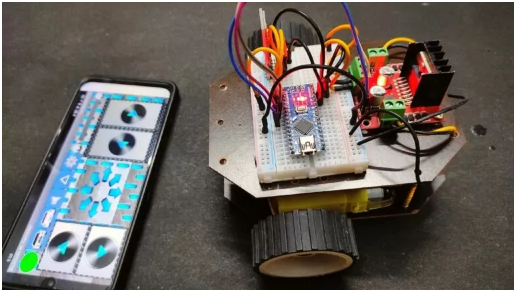
DIY Smart home: Control Lights and Electronics with Mobile Phone Watch The  Tutorial on YouTube Now !! In today’s fast-paced world, the concept of home automation is becoming increasingly popular. Imagine being able to control your home appliances, lights, and security systems with just a tap on your smartphone. Sounds futuristic, right? Well, with the power of Arduino and Bluetooth technology, you can turn this dream into reality. In this blog post, we’ll delve into the fascinating world of DIY home automation and learn how to create a simple yet effective system to control lights using Arduino and Bluetooth. Whether you’re a tech enthusiast, a hobbyist, or someone looking to add a touch of convenience and innovation to your home, this tutorial is for you. Getting Started: Before we dive into the nitty-gritty details, let’s take a quick look at the components you’ll need for this project:                                       Click on the links below to purchase the components Arduino Uno: The brain of our system, Arduino Uno will be responsible for processing commands and controlling the lights. Programming Cable for Arduino Jumper Wires Relay Module: Used to interface between Arduino and the high-voltage AC circuit of the light bulb. HC-05 Bluetooth Module: Enables wireless communication between Arduino and your smartphone. Light Bulb: Any standard light bulb that operates on 230V AC will work for this project. Light Bulb Holder Two Pin Connector Arduino Starter Kits(For Beginners):- Quad starter kit for Beginners to learn Arduino  (Rs 2600-2800) Basic Starter Kit (Rs 1700-1900) Basic Starter Kit (Rs 1200-1400)                                                            Setting Up the Hardware  The first step is to assemble the hardware components. Connect the relay module to Arduino Uno as per the wiring diagram provided in the Arduino documentation. Ensure that all connections are secure and double-check for any loose wires. Next, connect the light bulb to the relay module. Make sure to follow proper safety precautions when working with high-voltage circuits. Once everything is connected, power up the Arduino Uno using a USB cable or an external power source. Programming Arduino: With the hardware setup complete, it’s time to write the code for Arduino. We’ll use the Arduino IDE to write and upload the code to the board. The code will include instructions for initializing the Bluetooth module, reading commands from the smartphone, and controlling the relay module accordingly. Testing and Troubleshooting: Once the code is uploaded, it’s time to test our home automation system. Download a Bluetooth terminal app on your smartphone and pair it with the HC-05 Bluetooth module. Send commands from the app to Arduino and observe the response of the relay module. Download the Android Application Now  Android APP Download NOW!! CODE //search @TheIshanJain on youtube for more // Visit TheIshanJain.Com for More Information Enjoy the code!! String inputs; #define relay1 2 //Connect relay1 to pin 9 #define relay2 3 //Connect relay2 to pin 8 #define relay3 4 //Connect relay3 to pin 7 #define relay4 5 //Connect relay4 to pin 6 #define relay5 6 //Connect relay5 to pin 5 #define relay6 7 //Connect relay6 to pin 4 #define relay7 8 //Connect relay7 to pin 3 #define relay8 9 //Connect relay8 to pin 2 void setup() { Serial.begin(9600); pinMode(relay1, OUTPUT); pinMode(relay2, OUTPUT); pinMode(relay3, OUTPUT); pinMode(relay4, OUTPUT); pinMode(relay5, OUTPUT); pinMode(relay6, OUTPUT); pinMode(relay7, OUTPUT); pinMode(relay8, OUTPUT); digitalWrite(relay1, LOW); digitalWrite(relay2, LOW); digitalWrite(relay3, LOW); digitalWrite(relay4, LOW); digitalWrite(relay5, LOW); digitalWrite(relay6, LOW); digitalWrite(relay7, LOW); digitalWrite(relay8, LOW); } void loop() { while(Serial.available()) { delay(10); char c = Serial.read(); if (c == ‘#’){ break; } inputs += c; } if (inputs.length() >0) { Serial.println(inputs); if(inputs == “A”) { digitalWrite(relay1, LOW); } else if(inputs == “a”) { digitalWrite(relay1, HIGH); } else if(inputs == “B”) { digitalWrite(relay2, LOW); } else if(inputs == “b”) { digitalWrite(relay2, HIGH); } else if(inputs == “C”) { digitalWrite(relay3, LOW); } else if(inputs == “c”) { digitalWrite(relay3, HIGH); } else if(inputs == “D”) { digitalWrite(relay4, LOW); } else if(inputs == “d”) { digitalWrite(relay4, HIGH); } else if(inputs == “E”) { digitalWrite(relay5, LOW); } else if(inputs == “e”) { digitalWrite(relay5, HIGH); } else if(inputs == “F”) { digitalWrite(relay6, LOW); } else if(inputs == “f”) { digitalWrite(relay6, HIGH); } else if(inputs == “G”) { digitalWrite(relay7, LOW); } else if(inputs == “g”) { digitalWrite(relay7, HIGH); } else if(inputs == “H”) { digitalWrite(relay8, LOW); } else if(inputs == “h”) { digitalWrite(relay8, HIGH); } inputs=””; } }

Blog

Science Fair Winner Alert! Build a Bluetooth-Controlled Car in Minutes (Beginner-Friendly)

How To Make a DIY Bluetooth Car (Beginner-Friendly Guide) Imagine zooming around a miniature race track, controlling your car not with a clunky remote, but with the magic of your smartphone! Sounds incredible, right? Well, with this detailed guide, you can turn that dream into reality by building your very own Bluetooth-controlled car. This project is perfect for beginners, requiring minimal tools and offering a fun, hands-on way to learn about electronics and robotics. Before we dive in, gather your supplies: Essential Components with links: Arduino Nano: The brains of your operation, this microcontroller board processes information and sends commands to the motors. (Alternatives: Micro:bit, ESP32) L293D Motor Driver IC: Acts as a translator, receiving signals from the Arduino and controlling the direction and speed of your motors. (Alternatives: SN754410NE, TB6612FNG) 2x DC Motors (500 RPM): These are the workhorses, providing the power to move your car. Select motors with a voltage and current rating compatible with your battery pack and L293D specs. Castor Wheels: Ensure smooth movement and maneuverability. Choose wheels with a size and material suitable for your desired terrain. Metal Chassis (2-wheel): Provides a sturdy base for your car. Alternatively, you can use cardboard or other recycled materials for a low-cost option. NiMh Rechargeable Batteries (1.2v): Choose a battery pack with sufficient capacity to power your car for a decent playtime. Optional Components (for the extra zing): LEDs (Red and White): Add headlights and taillights for a realistic touch. Jumper Wires: Make connections between components quickly and easily. Breadboard (optional): Simplifies prototyping and testing your circuit before final assembly. Resistors (for LEDs): Ensure the correct resistance to protect your LEDs from damage. Software: “BT Control” App (Free): Available on the Playstore and App Store, this user-friendly app lets you control your car with your phone via Bluetooth. (Alternatives: RC Control Pro, BluetoothJoypad) Assembly and Programming: This guide won’t delve into the specific wiring and coding steps just yet.  We’ll save that for a dedicated video tutorial coming soon! However, here’s a high-level overview to get you excited: Assemble the chassis: Secure the motors and wheels to the chassis, ensuring proper alignment. Connect the L293D: Wire the motor driver to the Arduino according to the specific pin layout and follow the L293D datasheet for motor connections. Power up: Connect the battery pack to the power input of the motor driver and Arduino. Download the app: Install the “BT Control” app on your phone and pair it with your Arduino via Bluetooth. Optional: Add LEDs: If using LEDs, connect them with resistors to the Arduino board following proper circuits. Remember: Always consult the datasheets of your specific components for accurate wiring and voltage/current requirements. Double-check connections for any loose wires before applying power. The Learning Journey: Building this Bluetooth car isn’t just about creating a cool robot; it’s about unlocking a world of learning: Understand basic electronics: Learn how components like Arduino and motor drivers work together. Apply coding principles: While you won’t be coding yourself in this project, seeing how the app controls the car gives you a glimpse into programming concepts. Boost your problem-solving skills: Troubleshooting any circuit issues will sharpen your analytical thinking. Embrace creativity: Customize your car with unique designs and features, letting your imagination run wild. Ready to embark on this exciting journey? Stay tuned for our detailed video tutorial that will guide you through each step of building and programming your very own Bluetooth car. Remember, the world of DIY electronics is full of possibilities, so don’t hesitate to experiment, explore, and create something truly unique! Do you have any questions about specific component choices or modifications you’d like to explore? Ask away in the comments below, and let’s build something awesome together! Watch The Youtube tutorial  now !!

Blog

Arduino Code Upload Tutorial | Microcontrollers Explained + Applications for Beginners

The Tiny Brain of Your Arduino: Meet the Microcontroller! Imagine the Arduino Uno as a robot. It has eyes (sensors), ears (inputs), a mouth (outputs), and even a body (the board itself). But who controls it all? That’s where the microcontroller comes in – it’s the tiny brain that brings your Arduino projects to life! Think of it like a miniature computer on the board. It receives information from the sensors, follows your instructions (written as code), and controls the outputs like LEDs, motors, or even communicates with the internet. Here’s what makes a microcontroller special: Brains, not brawn: It’s powerful enough to understand your code and make decisions, but not as complex as a laptop or phone. Versatility: It can handle various tasks, from blinking an LED to processing sensor data. Compact size: Tiny enough to fit on an Arduino board, making it perfect for portable projects. Affordable: Costs just a few dollars, making Arduino projects accessible to everyone. Now, in the context of an Arduino Uno, the specific microcontroller is usually an ATmega328P. This little chip has: Memory: Stores your code and data. Processor: Carries out the instructions in your code. Pins: Connects to sensors, LEDs, and other components. Understanding the role of the microcontroller is crucial for anyone getting started with Arduino. It’s the heart of your project, translating your ideas into real-world actions. So, next time you build something amazing with your Arduino, remember the tiny maestro behind the scenes – the microcontroller! Bonus Tip: If you’re curious, research different types of microcontrollers and their capabilities. You might discover even more powerful brains for your future Arduino adventures! Watch The Youtube tutorial  now !! Product links Click on the links below to purchase required componets from Amazon.in Arduino Uno  Programing cable Copy the code below and paste it in your Arduino IDE to run //Theishanjain.com // the setup function runs once when you press reset or power the board void setup() { // initialize digital pin LED_BUILTIN as an output. pinMode(LED_BUILTIN, OUTPUT); } // the loop function runs over and over again forever void loop() { digitalWrite(LED_BUILTIN, HIGH); // turn the LED on (HIGH is the voltage level) delay(1000); // wait for a second digitalWrite(LED_BUILTIN, LOW); // turn the LED off by making the voltage LOW delay(1000); // wait for a second }

Scroll to Top