TheIshanJain.com

Blog

Your blog category

Blog

How to Make an Obstacle Avoiding & Line Following Robot Using Arduino|DIY Robotics Project with code

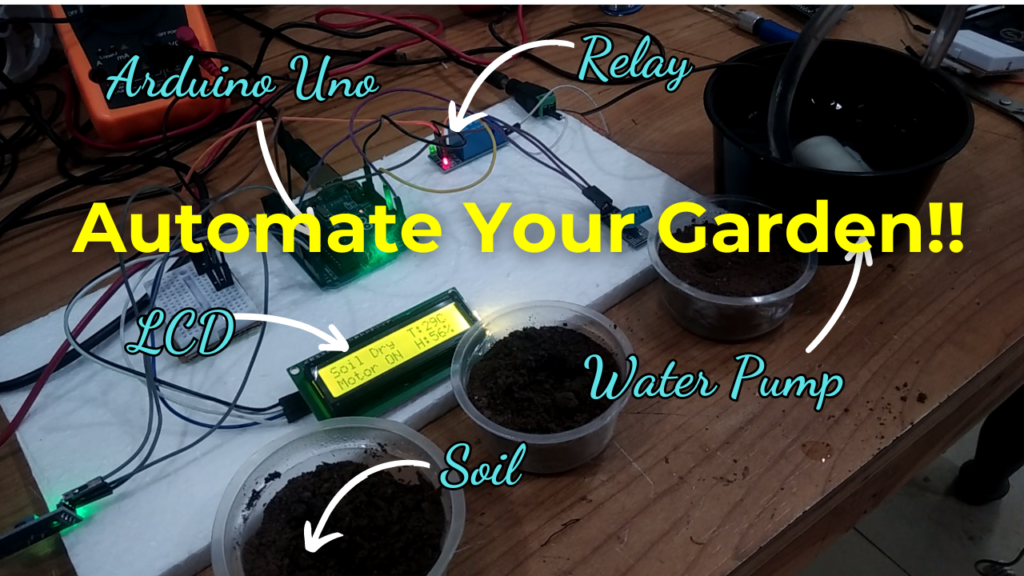
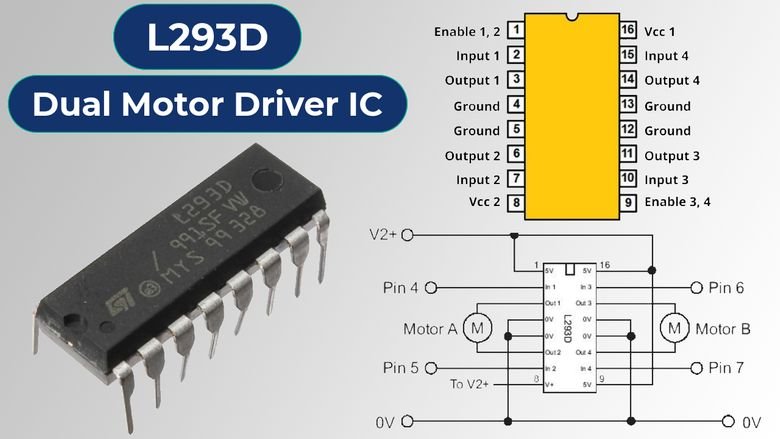
Build Your Own Arduino Robot: A Guide to Creating an Obstacle Avoiding + Line Following Bot In today’s tech-driven world, robotics is becoming increasingly accessible to enthusiasts of all levels. One exciting project that combines both learning and fun is creating an Obstacle Avoiding + Line Following Robot using Arduino. This project not only teaches valuable skills in programming and electronics but also results in a functional robot that can navigate its surroundings autonomously. Project Overview: The Obstacle Avoiding + Line Following Robot is designed to navigate through a predefined path while avoiding obstacles in its way. It utilizes infrared (IR) sensors to detect lines and obstacles, an ultrasonic sensor for distance measurement, and a servo motor for precise movement. With the help of an Arduino microcontroller and an L298N motor driver, the robot can make real-time decisions to adjust its course accordingly. How It Helps: This project serves as an excellent learning experience for students, hobbyists, and anyone interested in robotics. By building this robot, enthusiasts can gain hands-on experience in programming, circuit design, and mechanical assembly. Additionally, understanding the principles behind obstacle avoidance and line following is valuable for future projects in automation, robotics, and artificial intelligence. Parts List (With Purchase Links): To build this project, you’ll need the following components: Arduino Uno :  https://amzn.to/4aRGoGf L298N motor driver : https://amzn.to/3ynUktq Infrared (IR) sensors (2x) : https://amzn.to/44BP15U Ultrasonic sensor : https://amzn.to/4aiozzx Servo motor : https://amzn.to/4alCPY2 150 RPM geared motors (2x) : https://amzn.to/3wvT3A5 Metal chassis : https://amzn.to/3JZmDBg Wheels & Track belts :  https://amzn.to/3V6fxBn Bread Board : https: //amzn.to/4362oKY Jumper wires : https://amzn.to/3PXUM7W Gear I Use: Multimeter: https://amzn.to/3Q4oHet Soldering Iron: https://amzn.to/3VXLZ9y Drill Gun: https://amzn.to/3V4axgN Tools: https://amzn.to/48ETGnY Other Components: Beginners Kit [Arduino] https://amzn.to/4bTqbS6 (Rs 1500- Rs 2000) https://amzn.to/48FcByU (Rs 1200- Rs 1500) https://amzn.to/3TlADui (Rs 2000- Rs 2500) https://amzn.to/3uONdJo (Rs 3500- Rs 4000) Code and Schematics: To access the code and schematics for this project, please visit the following Google Drive link: Code and Schematics Step By Step Video : For a step-by-step visual guide on building the Obstacle Avoiding + Line Following Robot, check out our YouTube video: Project Video Embark on your robotics journey today by building your own Obstacle Avoiding + Line Following Robot. It’s not just a project; it’s a gateway to endless possibilities in the world of robotics and automation. Happy building! Hashtags: #DIYRobotics #ArduinoProject #Robotics #STEM #MakerMovement #TechEnthusiasts #ObstacleAvoidance #LineFollowing #EngineeringProject

Blog

Arduino LiFi System: Text Data Transfer via Smartphone Flashlight | My 2nd Year Engineering Project

Exploring LiFi: Revolutionizing Wireless Communication https://youtu.be/7oW06o4MVZ0 Introduction In the ever-evolving landscape of wireless communication, a groundbreaking technology has emerged, poised to revolutionize the way we connect and communicate: LiFi. In this blog post, we delve into the fascinating world of LiFi, its discovery by Dr. Harold Hass, its applications, and how it compares to traditional WiFi and emerging 5G technology. Discovery of LiFi by Dr. Harold Hass LiFi, short for Light Fidelity, was pioneered by Dr. Harold Hass, a renowned professor at the University of Edinburgh. In a TED Talk that captivated audiences worldwide, Dr. Hass introduced the concept of data transmission through light waves, utilizing LED bulbs to transmit data at unprecedented speeds. His groundbreaking research laid the foundation for what would become a game-changing technology in wireless communication. Applications of LiFi The applications of LiFi span across various industries and sectors, offering unparalleled advantages in terms of speed, security, and efficiency. Some notable applications include: Smart Lighting Systems: LiFi-enabled LED bulbs can serve dual purposes, providing illumination while also transmitting data to connected devices. Indoor Navigation: LiFi can be used for precise indoor positioning, revolutionizing navigation systems in environments where GPS signals may be unreliable. Healthcare: LiFi offers secure and high-speed data transmission, making it ideal for healthcare applications such as remote patient monitoring and medical device connectivity. Aviation and Automotive: LiFi can enhance in-flight entertainment systems and enable high-speed data transfer within vehicles, improving passenger experience and safety. LiFi vs. WiFi and 5G LiFi offers several advantages over traditional WiFi and emerging 5G technology: Speed: LiFi boasts significantly higher data transfer speeds compared to WiFi and 5G, making it ideal for bandwidth-intensive applications. Security: LiFi offers enhanced security as light waves cannot penetrate through walls, reducing the risk of signal interception or interference. Interference: LiFi operates in the visible light spectrum, minimizing interference from other wireless signals and ensuring reliable connectivity. Sustainability: LiFi utilizes LED bulbs for data transmission, which are energy-efficient and environmentally friendly, contributing to sustainability efforts. Building Your Own LiFi Project For enthusiasts looking to explore LiFi technology and build their own projects, we provide an APK and source code along with links to purchase the necessary components: APK, Source Code & Circuit Diagrams : Download Here Components: Purchase the required components from the following links: Arduino Uno Arduino Nano LDR Module LCD Display Oled Display Jumper Wires BreadBoard Gear I Use Multimeter Soldering Iron Drill Gun  Tools Conclusion As we embark on the era of LiFi technology, the possibilities are limitless. From transforming our homes and offices with smart lighting systems to revolutionizing industries with high-speed data transfer, LiFi holds the promise of a brighter and more connected future. Join us in embracing this groundbreaking technology and unlocking its full potential. Youtube References Dr. Harold Hass TED Talk pureLiFi CRERA – Think Beyond Stay Connected! To stay updated on the latest advancements in LiFi technology and explore more exciting projects, subscribe to our channel and follow us on social media. Let’s illuminate the world together with LiFi!

Blog

Mastering Plant Care: Step-by-Step Tutorial on Building an Automated Plant Watering System with Arduino Uno

Revolutionize Your Garden: Building an Automated Plant Watering System with Arduino Uno Introduction: In today’s fast-paced world, finding time to tend to our gardens can be a challenge. But what if there was a way to ensure our plants receive the care they need, even when we’re busy or away from home? Enter the world of DIY electronics and automation! In this blog post, we’ll explore how to build an automated plant watering system using Arduino Uno, revolutionizing the way we care for our gardens. Why Automated Plant Watering? Before we dive into the technical details, let’s consider the benefits of automated plant watering. By automating the watering process, we can: Ensure plants receive the right amount of water at the right time, promoting healthy growth. Save time and effort spent on manual watering, especially for large gardens or indoor plant collections. Monitor plant health remotely, allowing us to address any issues promptly, even when we’re away from home. Components Needed: To build our automated plant watering system, we’ll need the following components: Arduino Uno: The brains of our operation, responsible for monitoring soil moisture levels and controlling the watering system. Soil Moisture Sensor: Detects the moisture level in the soil and triggers the watering system when moisture levels are low. Relay Module: Controls the water pump or solenoid valve to deliver water to the plants. Breadboard 12v DC Pump : Delivers water from a reservoir to the plants. Jumper wires DC Socket Power Supply: Provides power to the Arduino Uno and other components. LCD Display + I2C:  DHT11 Temperature Sensor (for environmental monitoring). Building the System: Connect the soil moisture sensor to the Arduino Uno to measure soil moisture levels. Write code to read sensor data and control the relay module based on moisture levels. Connect the relay module to the water pump or solenoid valve to deliver water to the plants. Optionally, integrate additional sensors like the PIR motion sensor or DHT11 temperature sensor for enhanced functionality. Test the system to ensure proper operation and make any necessary adjustments. Watch the tutorial now to make your own Automated Garden Benefits of Using Arduino Uno: Arduino Uno is an ideal platform for building our automated plant watering system due to its ease of use, versatility, and affordability. With a vast community of makers and extensive documentation available online, Arduino Uno offers endless possibilities for creating custom electronics projects like ours. Conclusion: By harnessing the power of DIY electronics and automation, we can revolutionize the way we care for our gardens. With an automated plant watering system built using Arduino Uno, we can ensure our plants receive the care they need, even when life gets busy. So why wait? Let’s roll up our sleeves, unleash our creativity, and transform our gardens into thriving oases of greenery and life. Happy gardening! Copy the code below and paste it in your Arduino IDE to run   //Theishanjain.com //code by Ishan jain // visit https://theishanjain.com/index.php/home/ for more interesting stuff // Search @theishanjain on youtube !!! #include #include #define DHTPIN 2 // Pin connected to the DHT11 sensor #define DHTTYPE DHT11 // DHT 11 DHT dht(DHTPIN, DHTTYPE); LiquidCrystal_I2C lcd(0x27,16,2); int sensor_pin = A0; //Sensor Pin int relay_pin = 7; //Relay Pin void setup() { Serial.begin(9600); lcd.begin(16,2); lcd.backlight(); lcd.setBacklight(HIGH); dht.begin(); // Initialize DHT sensor pinMode(sensor_pin, INPUT); pinMode(relay_pin, OUTPUT); } void loop() { int sensor_data = analogRead(sensor_pin); int temperature = dht.readTemperature(); int humidity = dht.readHumidity(); Serial.print(“Sensor_data:”); Serial.print(sensor_data); Serial.print(“t | “); if(sensor_data > 950) { Serial.println(“No moisture, Soil is dry”); digitalWrite(relay_pin, LOW); lcd.setCursor(0,0); lcd.print(“Soil Dry “); lcd.setCursor(10,0); lcd.print(“T:”); lcd.print(temperature); lcd.print(“C”); Serial.print(“Temperature is: “); Serial.print(temperature); Serial.println(“C”); lcd.setCursor(10, 1); lcd.print(“H:”); lcd.print(humidity); lcd.print(“%”); Serial.print(“humidity is: “); Serial.print(humidity); Serial.println(“%”); Serial.println(“___________________________________________________”); lcd.setCursor(0,1); lcd.print(“Motor ON “); } else if(sensor_data >= 400 && sensor_data

Blog

DIY Home Automation Project: How to Make Smart Home with Arduino Uno | Bluetooth Control Tutorial

DIY Smart home: Control Lights and Electronics with Mobile Phone Watch The  Tutorial on YouTube Now !! In today’s fast-paced world, the concept of home automation is becoming increasingly popular. Imagine being able to control your home appliances, lights, and security systems with just a tap on your smartphone. Sounds futuristic, right? Well, with the power of Arduino and Bluetooth technology, you can turn this dream into reality. In this blog post, we’ll delve into the fascinating world of DIY home automation and learn how to create a simple yet effective system to control lights using Arduino and Bluetooth. Whether you’re a tech enthusiast, a hobbyist, or someone looking to add a touch of convenience and innovation to your home, this tutorial is for you. Getting Started: Before we dive into the nitty-gritty details, let’s take a quick look at the components you’ll need for this project:                                       Click on the links below to purchase the components Arduino Uno: The brain of our system, Arduino Uno will be responsible for processing commands and controlling the lights. Programming Cable for Arduino Jumper Wires Relay Module: Used to interface between Arduino and the high-voltage AC circuit of the light bulb. HC-05 Bluetooth Module: Enables wireless communication between Arduino and your smartphone. Light Bulb: Any standard light bulb that operates on 230V AC will work for this project. Light Bulb Holder Two Pin Connector Arduino Starter Kits(For Beginners):- Quad starter kit for Beginners to learn Arduino  (Rs 2600-2800) Basic Starter Kit (Rs 1700-1900) Basic Starter Kit (Rs 1200-1400)                                                            Setting Up the Hardware  The first step is to assemble the hardware components. Connect the relay module to Arduino Uno as per the wiring diagram provided in the Arduino documentation. Ensure that all connections are secure and double-check for any loose wires. Next, connect the light bulb to the relay module. Make sure to follow proper safety precautions when working with high-voltage circuits. Once everything is connected, power up the Arduino Uno using a USB cable or an external power source. Programming Arduino: With the hardware setup complete, it’s time to write the code for Arduino. We’ll use the Arduino IDE to write and upload the code to the board. The code will include instructions for initializing the Bluetooth module, reading commands from the smartphone, and controlling the relay module accordingly. Testing and Troubleshooting: Once the code is uploaded, it’s time to test our home automation system. Download a Bluetooth terminal app on your smartphone and pair it with the HC-05 Bluetooth module. Send commands from the app to Arduino and observe the response of the relay module. Download the Android Application Now  Android APP Download NOW!! CODE //search @TheIshanJain on youtube for more // Visit TheIshanJain.Com for More Information Enjoy the code!! String inputs; #define relay1 2 //Connect relay1 to pin 9 #define relay2 3 //Connect relay2 to pin 8 #define relay3 4 //Connect relay3 to pin 7 #define relay4 5 //Connect relay4 to pin 6 #define relay5 6 //Connect relay5 to pin 5 #define relay6 7 //Connect relay6 to pin 4 #define relay7 8 //Connect relay7 to pin 3 #define relay8 9 //Connect relay8 to pin 2 void setup() { Serial.begin(9600); pinMode(relay1, OUTPUT); pinMode(relay2, OUTPUT); pinMode(relay3, OUTPUT); pinMode(relay4, OUTPUT); pinMode(relay5, OUTPUT); pinMode(relay6, OUTPUT); pinMode(relay7, OUTPUT); pinMode(relay8, OUTPUT); digitalWrite(relay1, LOW); digitalWrite(relay2, LOW); digitalWrite(relay3, LOW); digitalWrite(relay4, LOW); digitalWrite(relay5, LOW); digitalWrite(relay6, LOW); digitalWrite(relay7, LOW); digitalWrite(relay8, LOW); } void loop() { while(Serial.available()) { delay(10); char c = Serial.read(); if (c == ‘#’){ break; } inputs += c; } if (inputs.length() >0) { Serial.println(inputs); if(inputs == “A”) { digitalWrite(relay1, LOW); } else if(inputs == “a”) { digitalWrite(relay1, HIGH); } else if(inputs == “B”) { digitalWrite(relay2, LOW); } else if(inputs == “b”) { digitalWrite(relay2, HIGH); } else if(inputs == “C”) { digitalWrite(relay3, LOW); } else if(inputs == “c”) { digitalWrite(relay3, HIGH); } else if(inputs == “D”) { digitalWrite(relay4, LOW); } else if(inputs == “d”) { digitalWrite(relay4, HIGH); } else if(inputs == “E”) { digitalWrite(relay5, LOW); } else if(inputs == “e”) { digitalWrite(relay5, HIGH); } else if(inputs == “F”) { digitalWrite(relay6, LOW); } else if(inputs == “f”) { digitalWrite(relay6, HIGH); } else if(inputs == “G”) { digitalWrite(relay7, LOW); } else if(inputs == “g”) { digitalWrite(relay7, HIGH); } else if(inputs == “H”) { digitalWrite(relay8, LOW); } else if(inputs == “h”) { digitalWrite(relay8, HIGH); } inputs=””; } }

Blog

How to Interface Joystick Module with Arduino Nano: Step-by-Step Guide with Code & Schematics

Mastering Joystick Control: Arduino Nano Tutorial In the world of DIY electronics, the Arduino Nano is a powerhouse for creating innovative projects. One of the most versatile components you can add to your arsenal is the joystick module. In this blog post, we’ll dive into the fascinating realm of joystick control and learn how to interface a joystick module with an Arduino Nano. Understanding the Joystick Module: Before we jump into the technical details, let’s take a moment to understand the joystick module itself. This compact module consists of two potentiometers (one for the X-axis and one for the Y-axis) and a tactile switch. By manipulating the joystick’s position, you can generate analog signals that can be read by the Arduino Nano. Components:-(click on the links below to purchase) Arduino Nano Joystick module Jumper Wires Bread Board  Wiring the Components: The first step in our tutorial is to wire the joystick module to the Arduino Nano. Using jumper wires, connect the X-axis and Y-axis outputs of the joystick module to the analog input pins A0 and A1 on the Arduino Nano, respectively. Additionally, connect the switch output to a digital input pin, such as pin 2. Writing the Code: With the hardware setup complete, it’s time to write the code for our Arduino Nano. We’ll use the Arduino IDE to write a simple sketch that reads the analog values from the joystick module and maps them to servo motor positions. This will allow us to control a servo motor’s position by moving the joystick. Testing and Fine-Tuning: Once the code is uploaded to the Arduino Nano, it’s time to test our setup. Move the joystick in different directions and observe the movement of the servo motor. You may need to fine-tune the code and adjust the mapping values to achieve the desired behavior. Expanding Your Project: Now that you’ve mastered joystick control with Arduino Nano, the possibilities are endless. Consider integrating additional components, such as LEDs, motors, or sensors, to create more complex projects. With a solid understanding of joystick control, you’re well-equipped to tackle a wide range of DIY electronics projects. Conclusion: In this blog post, we’ve explored the exciting world of joystick control with Arduino Nano. By interfacing a joystick module with an Arduino Nano, you can create interactive projects that respond to user input in real-time. Whether you’re a beginner or an experienced maker, joystick control is a valuable skill to add to your toolkit. Code & Schematics //Theishanjain.com subscribe to our Youtube channel @Theishanjain //How to use the joystick module. //Read the code below and use it for any of your creation void setup() { Serial.begin(9600);//enable serial monitor } void loop() { int joy = analogRead(A0);//get analog value (0-1024) int joy1 = analogRead(A1);//get analog value (0-1024) String x = “x axis “;//creating string variable String y = “y axis “;//creating string variable Serial.print(x + joy);//print x axis value Serial.print(“t”);//tab space Serial.println(y + joy1);//print y axis value Serial.println( “”);//space delay(100);//delay } Watch The Youtube tutorial  now !!

Blog

Science Fair Winner Alert! Build a Bluetooth-Controlled Car in Minutes (Beginner-Friendly)

How To Make a DIY Bluetooth Car (Beginner-Friendly Guide) Imagine zooming around a miniature race track, controlling your car not with a clunky remote, but with the magic of your smartphone! Sounds incredible, right? Well, with this detailed guide, you can turn that dream into reality by building your very own Bluetooth-controlled car. This project is perfect for beginners, requiring minimal tools and offering a fun, hands-on way to learn about electronics and robotics. Before we dive in, gather your supplies: Essential Components with links: Arduino Nano: The brains of your operation, this microcontroller board processes information and sends commands to the motors. (Alternatives: Micro:bit, ESP32) L293D Motor Driver IC: Acts as a translator, receiving signals from the Arduino and controlling the direction and speed of your motors. (Alternatives: SN754410NE, TB6612FNG) 2x DC Motors (500 RPM): These are the workhorses, providing the power to move your car. Select motors with a voltage and current rating compatible with your battery pack and L293D specs. Castor Wheels: Ensure smooth movement and maneuverability. Choose wheels with a size and material suitable for your desired terrain. Metal Chassis (2-wheel): Provides a sturdy base for your car. Alternatively, you can use cardboard or other recycled materials for a low-cost option. NiMh Rechargeable Batteries (1.2v): Choose a battery pack with sufficient capacity to power your car for a decent playtime. Optional Components (for the extra zing): LEDs (Red and White): Add headlights and taillights for a realistic touch. Jumper Wires: Make connections between components quickly and easily. Breadboard (optional): Simplifies prototyping and testing your circuit before final assembly. Resistors (for LEDs): Ensure the correct resistance to protect your LEDs from damage. Software: “BT Control” App (Free): Available on the Playstore and App Store, this user-friendly app lets you control your car with your phone via Bluetooth. (Alternatives: RC Control Pro, BluetoothJoypad) Assembly and Programming: This guide won’t delve into the specific wiring and coding steps just yet.  We’ll save that for a dedicated video tutorial coming soon! However, here’s a high-level overview to get you excited: Assemble the chassis: Secure the motors and wheels to the chassis, ensuring proper alignment. Connect the L293D: Wire the motor driver to the Arduino according to the specific pin layout and follow the L293D datasheet for motor connections. Power up: Connect the battery pack to the power input of the motor driver and Arduino. Download the app: Install the “BT Control” app on your phone and pair it with your Arduino via Bluetooth. Optional: Add LEDs: If using LEDs, connect them with resistors to the Arduino board following proper circuits. Remember: Always consult the datasheets of your specific components for accurate wiring and voltage/current requirements. Double-check connections for any loose wires before applying power. The Learning Journey: Building this Bluetooth car isn’t just about creating a cool robot; it’s about unlocking a world of learning: Understand basic electronics: Learn how components like Arduino and motor drivers work together. Apply coding principles: While you won’t be coding yourself in this project, seeing how the app controls the car gives you a glimpse into programming concepts. Boost your problem-solving skills: Troubleshooting any circuit issues will sharpen your analytical thinking. Embrace creativity: Customize your car with unique designs and features, letting your imagination run wild. Ready to embark on this exciting journey? Stay tuned for our detailed video tutorial that will guide you through each step of building and programming your very own Bluetooth car. Remember, the world of DIY electronics is full of possibilities, so don’t hesitate to experiment, explore, and create something truly unique! Do you have any questions about specific component choices or modifications you’d like to explore? Ask away in the comments below, and let’s build something awesome together! Watch The Youtube tutorial  now !!

Blog

Unleash the Power of Motors: Build Your Own L293D Driver at Home

How To Make Your Own L293D Motor Driver at Home! The world of robotics and electronics is teeming with possibilities, and controlling motors is a foundational skill for many exciting projects. While pre-made motor drivers are readily available, there’s something incredibly rewarding about building your own. Enter the L293D, a versatile and popular integrated circuit (IC) that empowers you to command the movement of DC motors with ease. This blog post will not only guide you through the step-by-step process of building your own L293D motor driver but also equip you with the knowledge and understanding to unleash its full potential in your projects. The Mighty L293D: Under the hood of this little chip lies a powerful dual H-bridge, allowing you to control two DC motors independently in both forward and reverse directions. It boasts impressive specifications: Voltage range: 4.5V to 36V, catering to various motor requirements. Output current: Up to 600mA per channel, suitable for small to medium-sized motors. Logic supply voltage: Separate logic supply for improved noise immunity. Internal ESD protection: Safeguards your circuit from electrostatic discharge. Building Your Own Driver: With readily available components and a bit of soldering know-how, you can bring your L293D driver to life. The process involves: Gathering components: Resistors, capacitors, transistors, LEDs, and of course, the L293D IC itself. Understanding the circuit diagram: Deciphering the connections and component roles. Soldering the components: Building the circuit on a breadboard or perfboard (depending on your desired level of permanence). Connecting your motors: Following the proper wiring scheme for desired direction control. Powering up and testing: Bringing your creation to life and experiencing the joy of controlling motors with your own creation! Beyond the Basics: Building your driver unlocks a world of possibilities. You can: Control multiple motors simultaneously: Expand your project’s capabilities. Implement feedback mechanisms: Use sensors to control motor speed and direction precisely. Integrate it with microcontrollers: Drive your projects with Arduino or Raspberry Pi. The Benefits of DIY: Building your own motor driver offers more than just functionality. It’s a learning experience that enhances your: Understanding of electronics: Gain valuable insights into circuit design and motor control principles. Troubleshooting skills: Identify and solve issues during the build and beyond. Sense of accomplishment: Take pride in creating something functional and customized to your needs. Ready to embark on your DIY motor driver journey? Stay tuned for our upcoming video tutorial that walks you through the building process step-by-step! In the meantime, grab your components, explore the L293D’s datasheet, and get ready to take control of your next robotic project! Watch The Youtube tutorial  now !! Product links Click on the links below to purchase required componets from Amazon.inL293D Motor Driver IC Bread Board DC Motor Switch 9V Battery and Snapper

Blog

Arduino Code Upload Tutorial | Microcontrollers Explained + Applications for Beginners

The Tiny Brain of Your Arduino: Meet the Microcontroller! Imagine the Arduino Uno as a robot. It has eyes (sensors), ears (inputs), a mouth (outputs), and even a body (the board itself). But who controls it all? That’s where the microcontroller comes in – it’s the tiny brain that brings your Arduino projects to life! Think of it like a miniature computer on the board. It receives information from the sensors, follows your instructions (written as code), and controls the outputs like LEDs, motors, or even communicates with the internet. Here’s what makes a microcontroller special: Brains, not brawn: It’s powerful enough to understand your code and make decisions, but not as complex as a laptop or phone. Versatility: It can handle various tasks, from blinking an LED to processing sensor data. Compact size: Tiny enough to fit on an Arduino board, making it perfect for portable projects. Affordable: Costs just a few dollars, making Arduino projects accessible to everyone. Now, in the context of an Arduino Uno, the specific microcontroller is usually an ATmega328P. This little chip has: Memory: Stores your code and data. Processor: Carries out the instructions in your code. Pins: Connects to sensors, LEDs, and other components. Understanding the role of the microcontroller is crucial for anyone getting started with Arduino. It’s the heart of your project, translating your ideas into real-world actions. So, next time you build something amazing with your Arduino, remember the tiny maestro behind the scenes – the microcontroller! Bonus Tip: If you’re curious, research different types of microcontrollers and their capabilities. You might discover even more powerful brains for your future Arduino adventures! Watch The Youtube tutorial  now !! Product links Click on the links below to purchase required componets from Amazon.in Arduino Uno  Programing cable Copy the code below and paste it in your Arduino IDE to run //Theishanjain.com // the setup function runs once when you press reset or power the board void setup() { // initialize digital pin LED_BUILTIN as an output. pinMode(LED_BUILTIN, OUTPUT); } // the loop function runs over and over again forever void loop() { digitalWrite(LED_BUILTIN, HIGH); // turn the LED on (HIGH is the voltage level) delay(1000); // wait for a second digitalWrite(LED_BUILTIN, LOW); // turn the LED off by making the voltage LOW delay(1000); // wait for a second }

Scroll to Top