How To Make Your Own L293D Motor Driver at Home!

The world of robotics and electronics is teeming with possibilities, and controlling motors is a foundational skill for many exciting projects. While pre-made motor drivers are readily available, there’s something incredibly rewarding about building your own. Enter the L293D, a versatile and popular integrated circuit (IC) that empowers you to command the movement of DC motors with ease.
This blog post will not only guide you through the step-by-step process of building your own L293D motor driver but also equip you with the knowledge and understanding to unleash its full potential in your projects.
The Mighty L293D:
Under the hood of this little chip lies a powerful dual H-bridge, allowing you to control two DC motors independently in both forward and reverse directions. It boasts impressive specifications:
- Voltage range: 4.5V to 36V, catering to various motor requirements.
- Output current: Up to 600mA per channel, suitable for small to medium-sized motors.
- Logic supply voltage: Separate logic supply for improved noise immunity.
- Internal ESD protection: Safeguards your circuit from electrostatic discharge.
Building Your Own Driver:
With readily available components and a bit of soldering know-how, you can bring your L293D driver to life. The process involves:
- Gathering components: Resistors, capacitors, transistors, LEDs, and of course, the L293D IC itself.
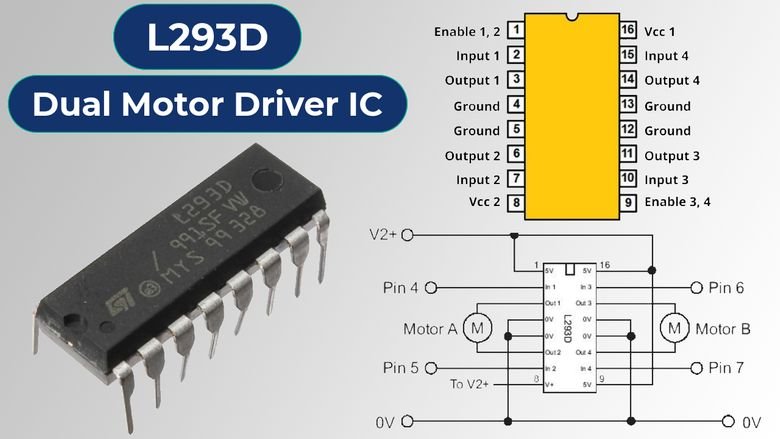
- Understanding the circuit diagram: Deciphering the connections and component roles.
- Soldering the components: Building the circuit on a breadboard or perfboard (depending on your desired level of permanence).
- Connecting your motors: Following the proper wiring scheme for desired direction control.
- Powering up and testing: Bringing your creation to life and experiencing the joy of controlling motors with your own creation!
Beyond the Basics:
Building your driver unlocks a world of possibilities. You can:
- Control multiple motors simultaneously: Expand your project’s capabilities.
- Implement feedback mechanisms: Use sensors to control motor speed and direction precisely.
- Integrate it with microcontrollers: Drive your projects with Arduino or Raspberry Pi.
The Benefits of DIY:
Building your own motor driver offers more than just functionality. It’s a learning experience that enhances your:
- Understanding of electronics: Gain valuable insights into circuit design and motor control principles.
- Troubleshooting skills: Identify and solve issues during the build and beyond.
- Sense of accomplishment: Take pride in creating something functional and customized to your needs.
Ready to embark on your DIY motor driver journey? Stay tuned for our upcoming video tutorial that walks you through the building process step-by-step! In the meantime, grab your components, explore the L293D’s datasheet, and get ready to take control of your next robotic project!
Product links
Click on the links below to purchase required componets from Amazon.in
L293D Motor Driver IC


