The Tiny Brain of Your Arduino: Meet the Microcontroller!
Imagine the Arduino Uno as a robot. It has eyes (sensors), ears (inputs), a mouth (outputs), and even a body (the board itself). But who controls it all? That’s where the microcontroller comes in – it’s the tiny brain that brings your Arduino projects to life!
Think of it like a miniature computer on the board. It receives information from the sensors, follows your instructions (written as code), and controls the outputs like LEDs, motors, or even communicates with the internet.
Here’s what makes a microcontroller special:
- Brains, not brawn: It’s powerful enough to understand your code and make decisions, but not as complex as a laptop or phone.
- Versatility: It can handle various tasks, from blinking an LED to processing sensor data.
- Compact size: Tiny enough to fit on an Arduino board, making it perfect for portable projects.
- Affordable: Costs just a few dollars, making Arduino projects accessible to everyone.
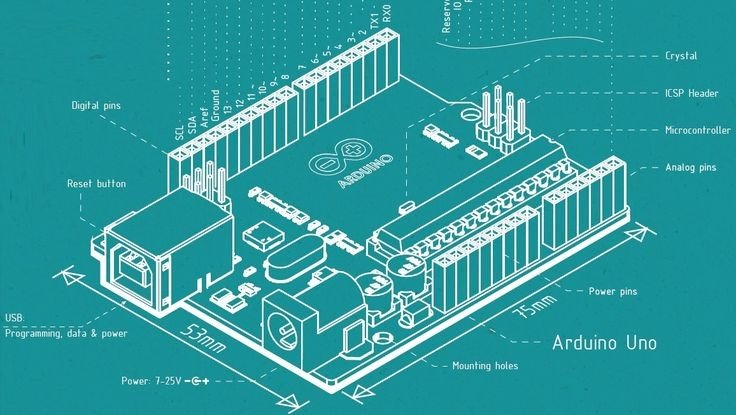
Now, in the context of an Arduino Uno, the specific microcontroller is usually an ATmega328P. This little chip has:
- Memory: Stores your code and data.
- Processor: Carries out the instructions in your code.
- Pins: Connects to sensors, LEDs, and other components.
Understanding the role of the microcontroller is crucial for anyone getting started with Arduino. It’s the heart of your project, translating your ideas into real-world actions. So, next time you build something amazing with your Arduino, remember the tiny maestro behind the scenes – the microcontroller!
Bonus Tip: If you’re curious, research different types of microcontrollers and their capabilities. You might discover even more powerful brains for your future Arduino adventures!

Product links
Click on the links below to purchase required componets from Amazon.in
Arduino Uno
Programing cable
Recent Posts
Copy the code below and paste it in your Arduino IDE to run
//Theishanjain.com
// the setup function runs once when you press reset or power the board
void setup() {
  // initialize digital pin LED_BUILTIN as an output.
  pinMode(LED_BUILTIN, OUTPUT);
}

// the loop function runs over and over again forever
void loop() {
  digitalWrite(LED_BUILTIN, HIGH);   // turn the LED on (HIGH is the voltage level)
  delay(1000);                       // wait for a second
  digitalWrite(LED_BUILTIN, LOW);    // turn the LED off by making the voltage LOW
  delay(1000);                       // wait for a second
}